Online Store Set Up: 12 Things You Must Do to Get Your New Store Up & Running
So you’ve got the bare bones of a new online store set up… Now what?
Every new ecommerce entrepreneur has gone through this stage—you’ve figured out how to actually set up a website but where do you go from here? We know how lost and overwhelmed new entrepreneurs feel at this point in the set-up process, so this post gives you 12 things you need to do to get your new online store set up right.
Getting these 12 things set up will help you run a better, more professional, and more efficient online store in the future so take the time now to put them into practice. You’ll be glad you did! They’re certainly not the glamorous side of setting up an online business, but they’re essential and practical nonetheless.
Let’s get right into it.
Get Set Up
Set Up Google Analytics
Having an online store is great but it’s no good if you’re operating solely on hunches and guesswork. Google Analytics gives you powerful and flexible insights into your online store that can provide data-driven metrics to power your decision making.
Google Analytics is a tool that can be connected to your web presence—in your case, to your online store—and it provides analysis about your web pages, your visitors, and what your visitors do. In order to begin viewing the insights, Google Analytics has to be set up and has to have had time to collect data. For that reason, the sooner you get set up, the sooner you can begin reaping the benefits.
Why it’s Important
Though most ecommerce platforms have their own kind of analytics implemented, none of them come close to what Google Analytics can provide you—and best of all, it’s free! That makes it a no-brainer must-have for all online store owners.
With Google Analytics, you’ll be able to see where your customers are arriving from (hint: that means you should focus on those areas more!), which products are most popular, the demographics of your visitors, which web pages are most visited, and so much more.
The data options are endless, and though fully grasping Google Analytics is a life-long endeavor and has a bit of a learning curve, even the most basic insights can be immensely helpful for you and your store. Plus, Google Analytics is also important to implement now because as your store grows and you either decide to sell it or reach out to investors for funding, one of the first things they’ll want to review is your Google Analytics data. It’s an industry-standard tool used across all platforms for reviewing critical metrics of a business, so get it set up so you can keep track of yours.
How to Get Started
Setting up your Google Analytics account will be the same for everyone, but connecting it to your online store will vary depending on which platform you’re using.
The first step will be to go to Google Analytics. There, you should log in with a Gmail account.
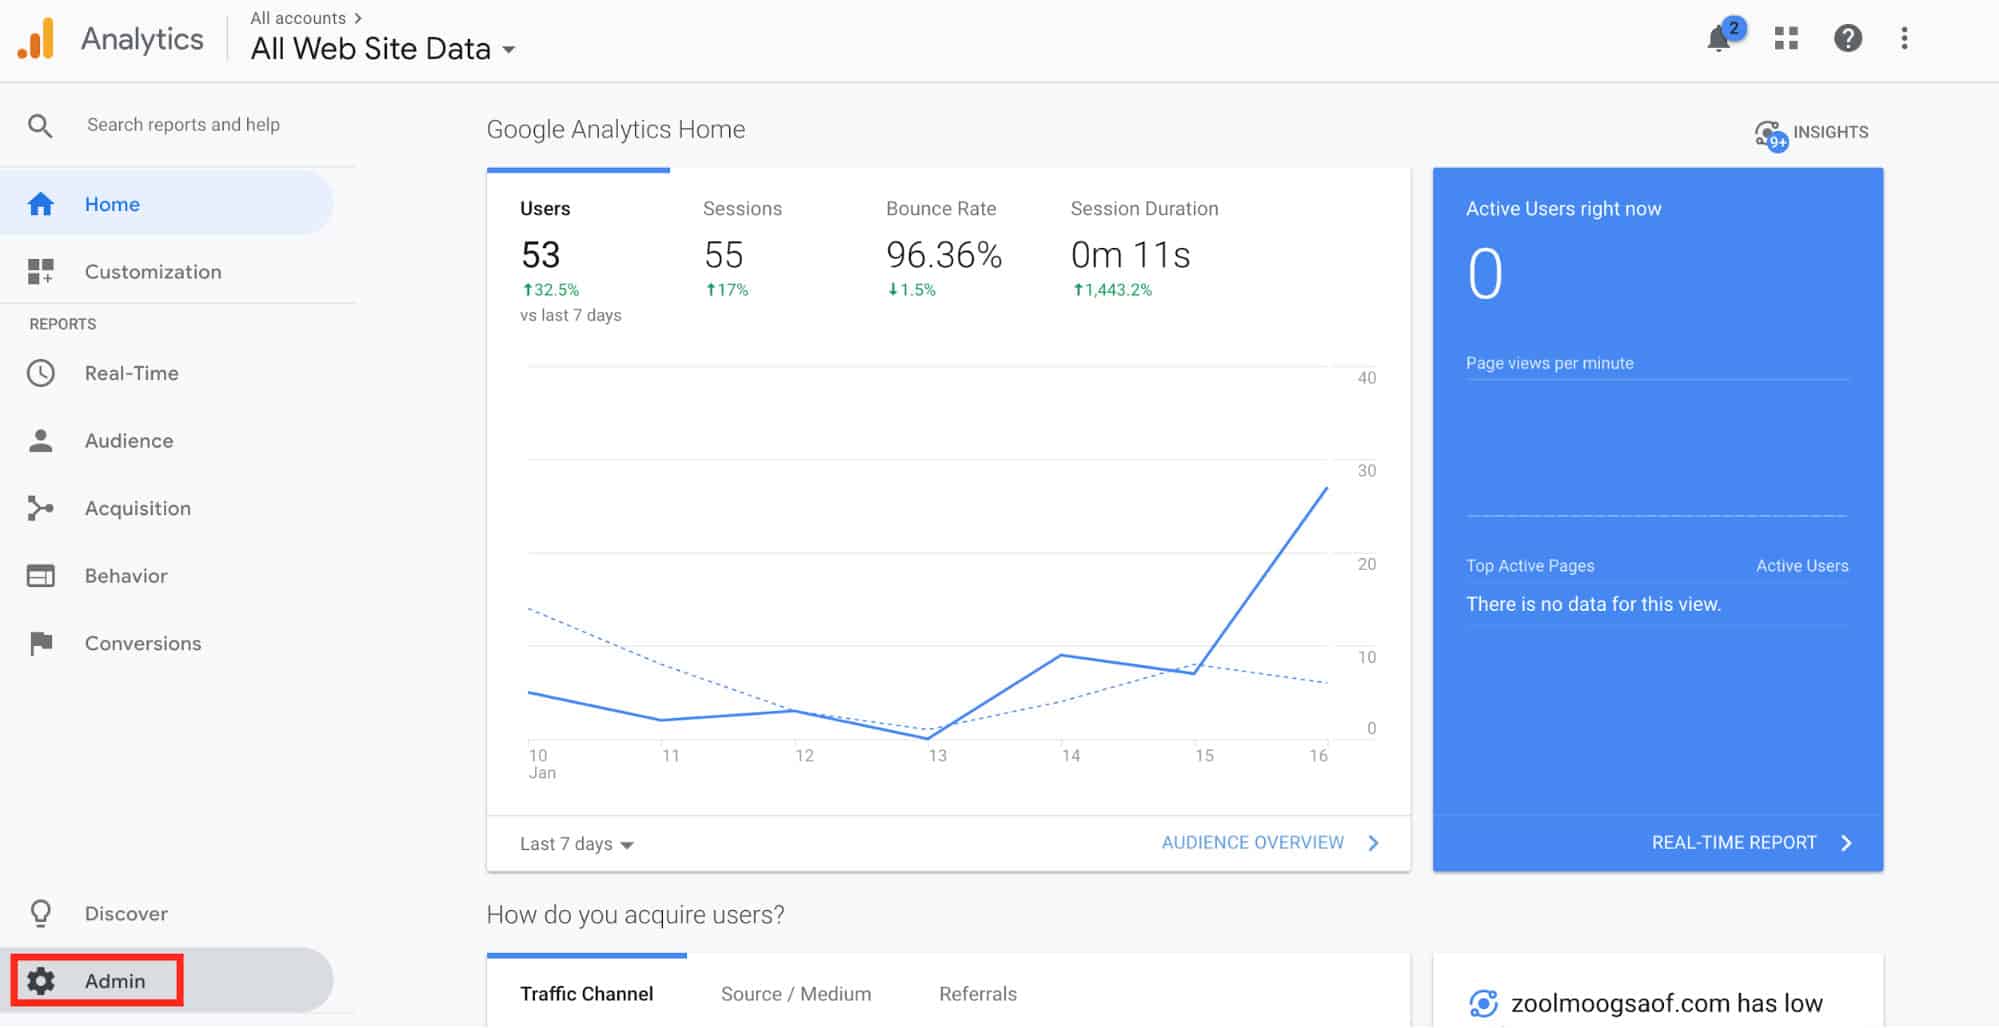
Click on “Admin” in the bottom left corner, next to the cog icon.
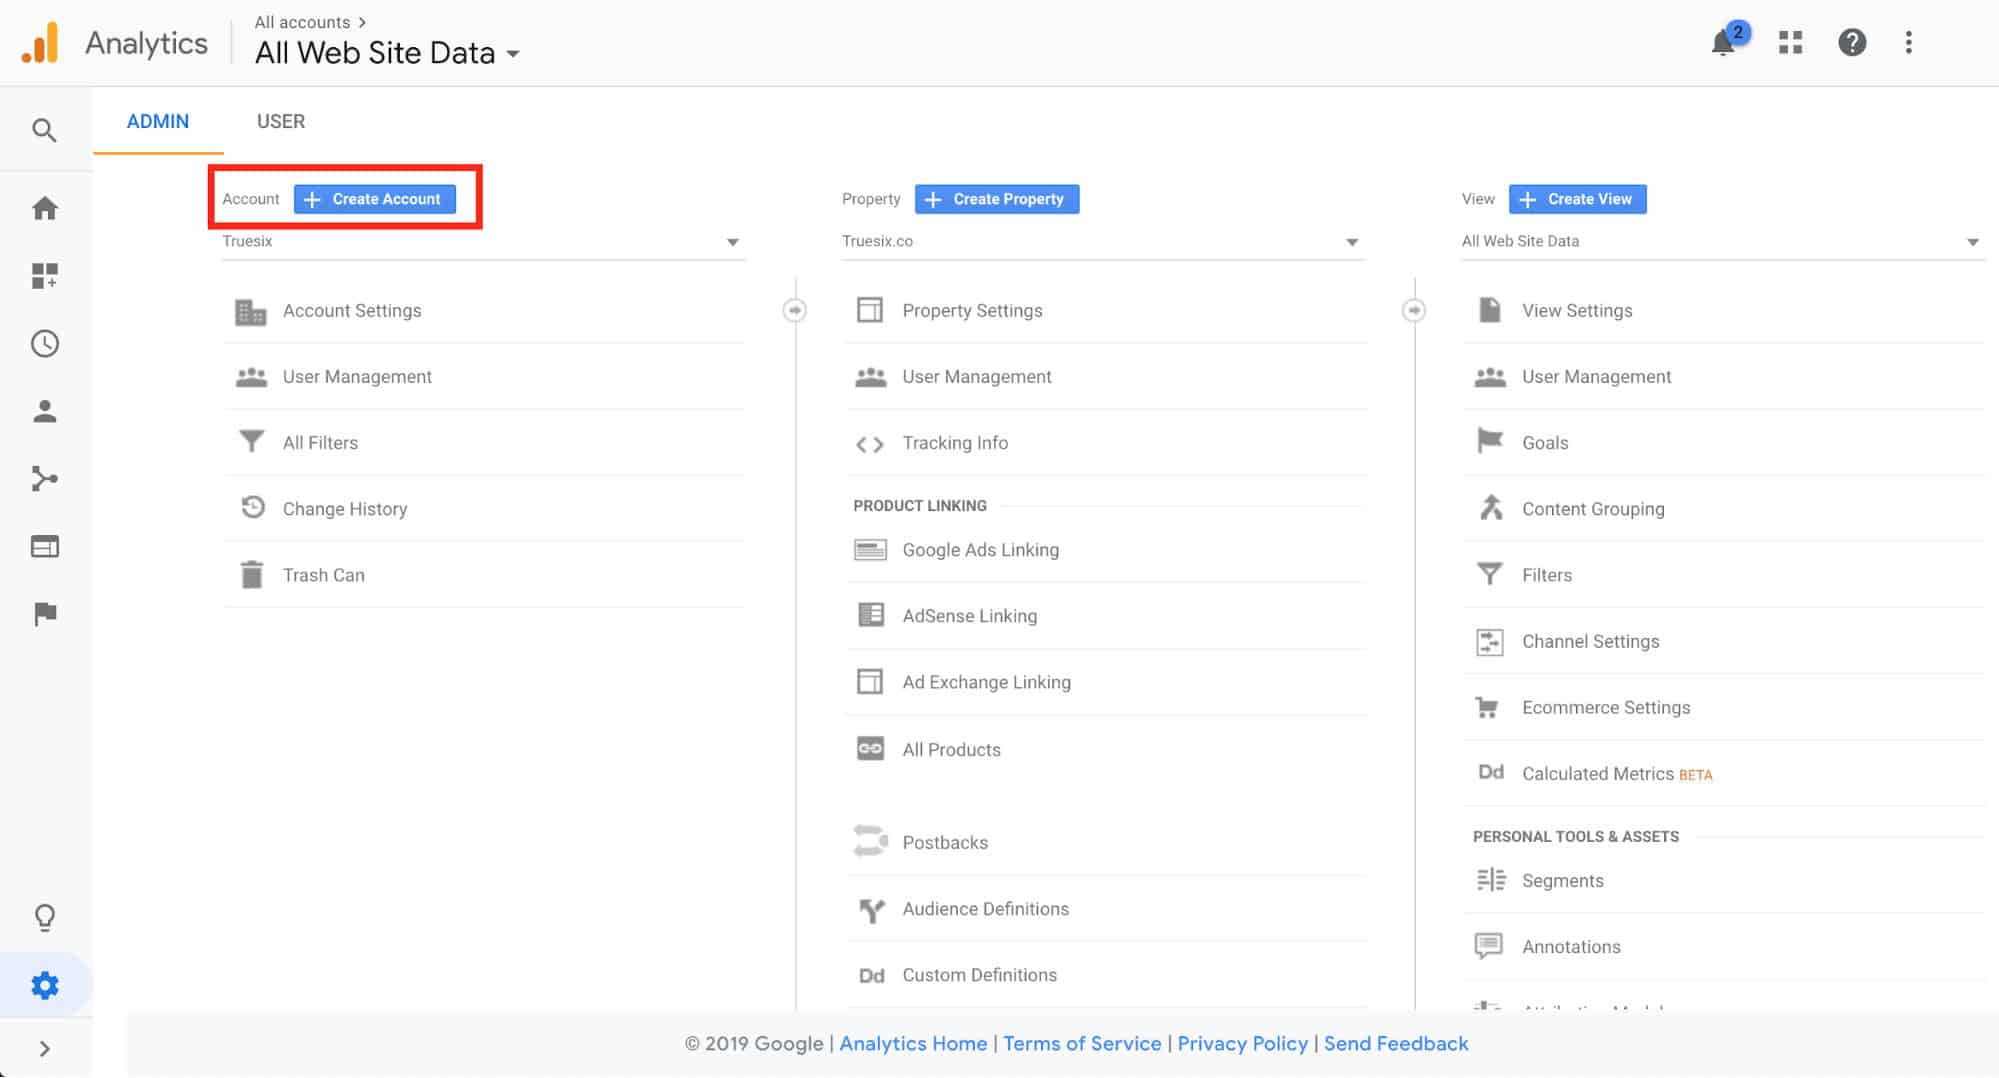
In the “Account” column, create an account under which to place the property (or select an existing account if you already have one).
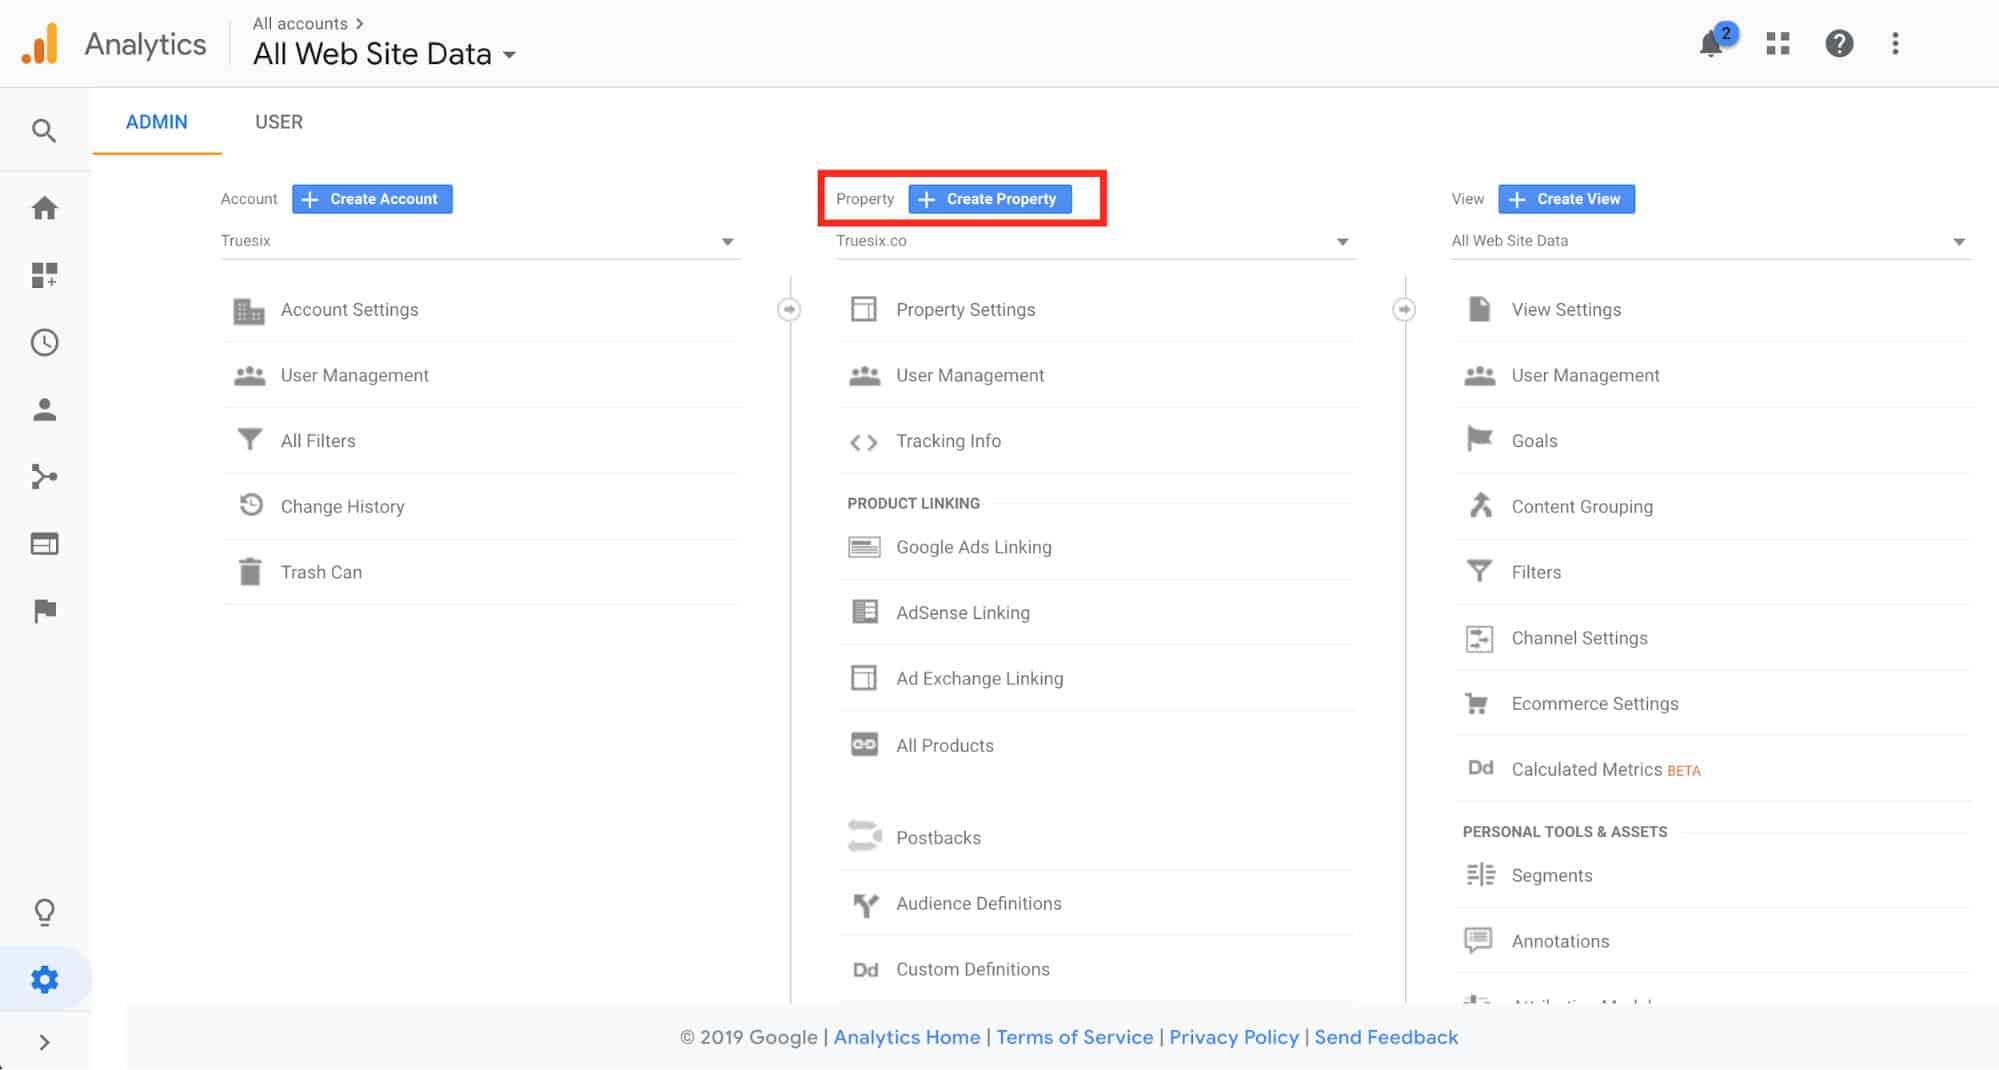
Under the “Property” column, click “Create new property.”
Fill out the data asked, including the name of the property (which is only visible to you), the website URL, the time zone, etc. then click “Get Tracking ID.”
Depending on which ecommerce platform you use, connect the store to your account. For most platforms, you’ll simply have to paste the tracking ID into the window of your settings on that platform. Learn more about how to connect Google Analytics to your Shopify store here, connect Google Analytics to your BigCommerce store here, and connect Google Analytics to your WooCommerce store here.
![]()
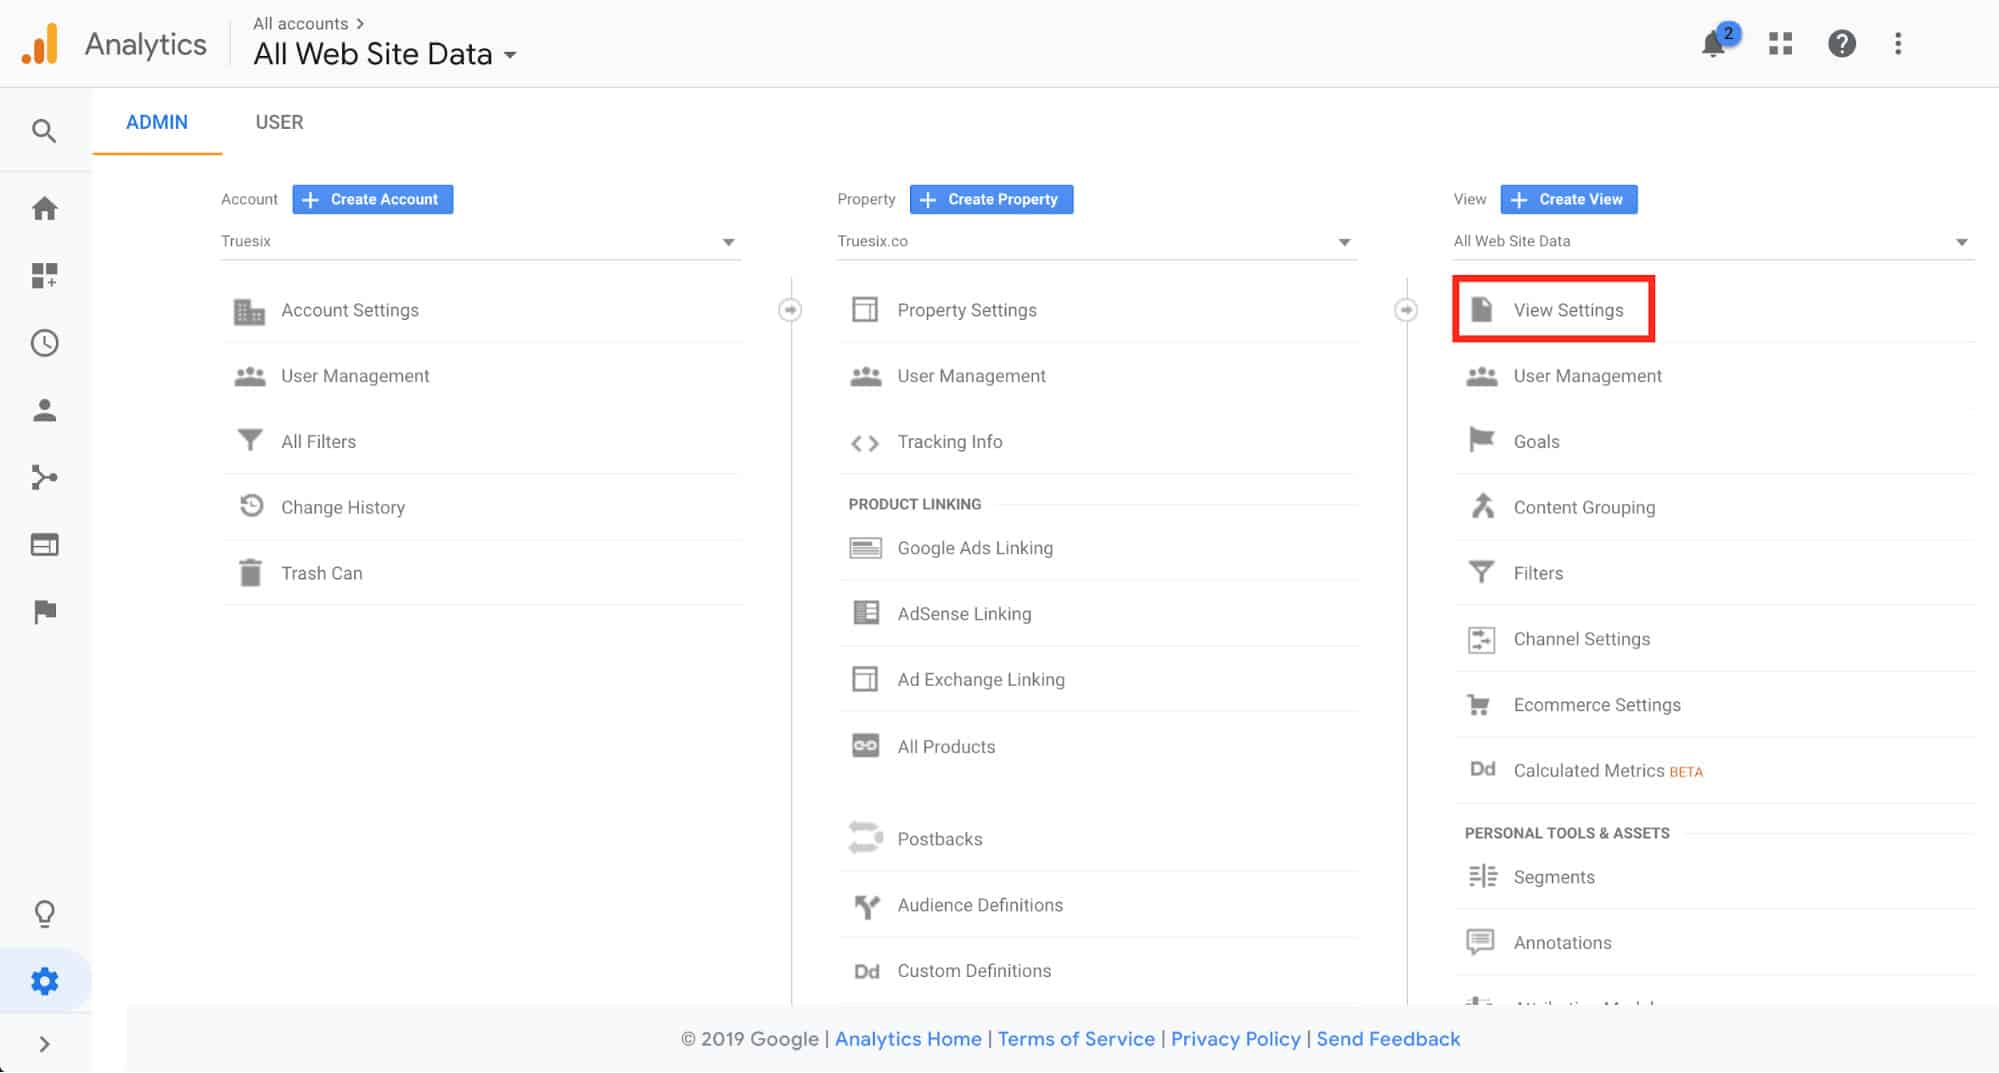
Enable ecommerce settings by going to Admin again (at bottom left corner with the cog icon), then by clicking “View Settings” under the “View” column.
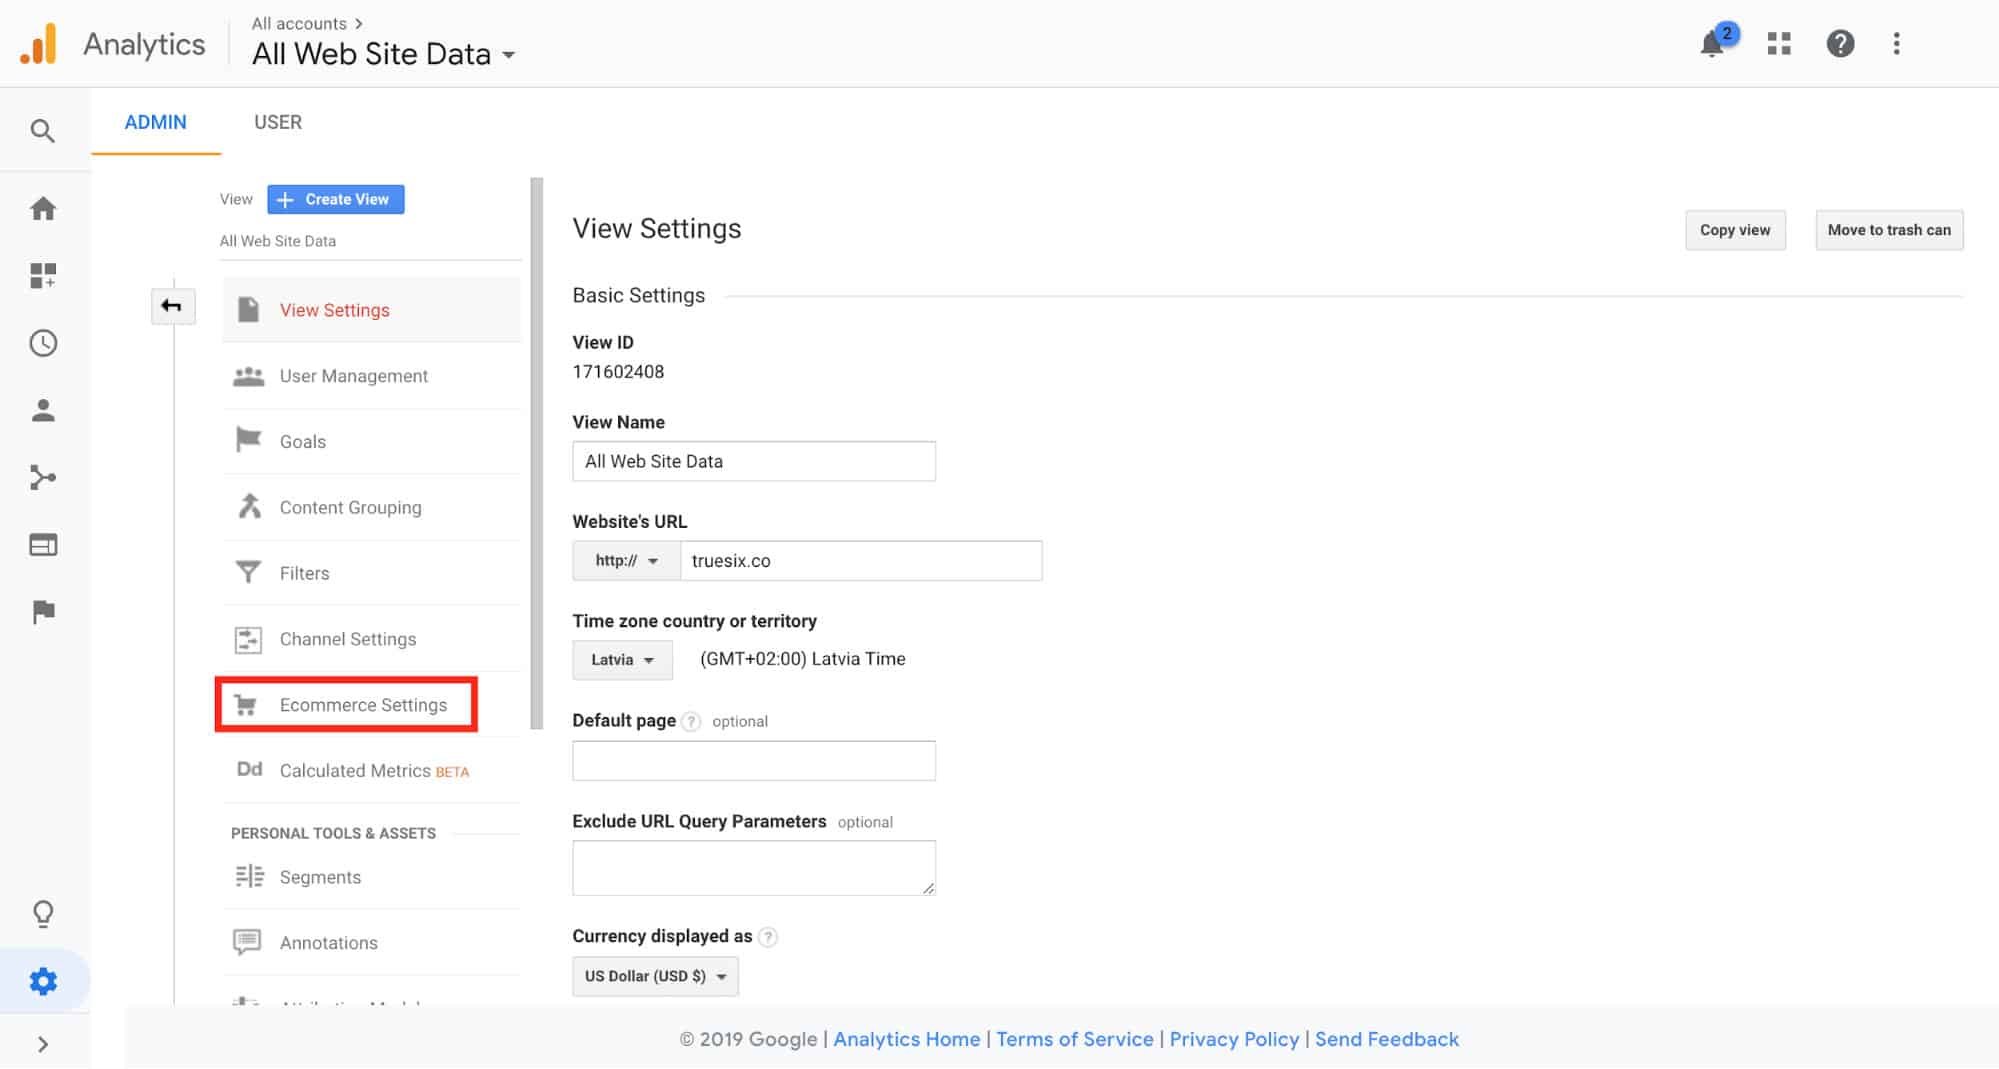
Choose the “Ecommerce Settings” tab on the left-hand side to access the ecommerce settings section.
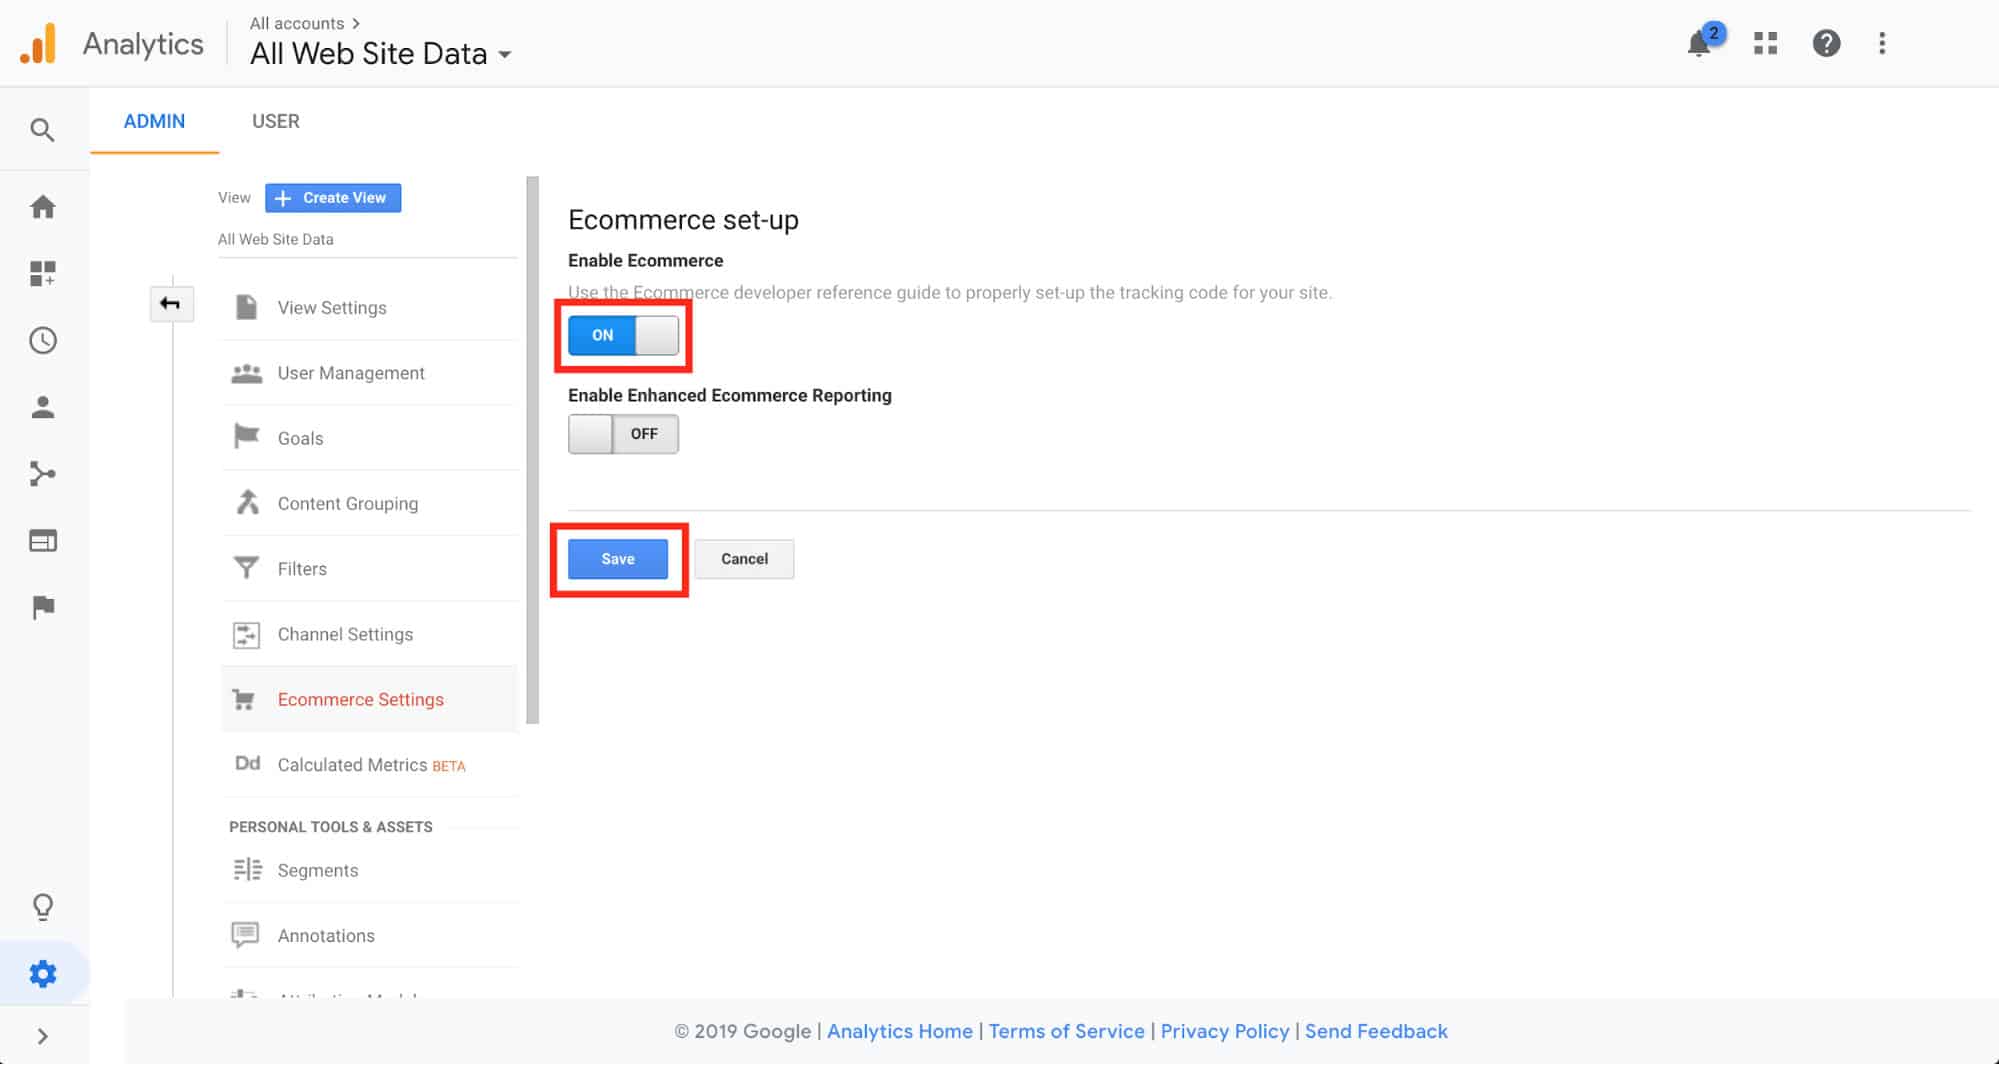
Toggle the “Enable Ecommerce” button to “On,” then click “Next Step,” then “Submit.”
Now, you’ll have a fully functional Google Analytics account that tracks your store’s activity, including the number of products sold.
Recommended Resources
- Get Started with Analytics by Google
- Beginner’s Guide to Google Analytics for Ecommerce by Printful
- The Absolute Beginner’s Guide to Google Analytics by Moz
- Connect Google Analytics to Your Shopify Store
- Connect Google Analytics to Your BigCommerce Store
- Connect Google Analytics to Your WooCommerce Store
Recommended Apps
Set Up Google Search Console & Bing Webmaster Tools
Google Search Console and Bing Webmaster Tools are free services that help you evaluate and improve your site’s performance in search. With the help of webmaster tools, you can see things like:
- Your store’s overall performance on search engines
- Best-performing pages
- Pages with errors (404 errors, crawling and indexing problems, etc.)
- Top search queries that your store is ranking for
- It’s also a way for Google & Bing to contact you if there’s any issues or errors with your site and it’s visibility in search engines
By knowing how your website is performing and its weak points, you can fix the problems and boost your store’s visibility on search engines.
Why it’s Important
Every day, people perform 5.6 billion searches on Google and 8.73 million searches on Bing. That’s the audience you’re losing out on if your store doesn’t meet their requirements or if your pages have errors and/or can’t be crawled.
Webmaster tools help you keep your website in a healthy condition by showing you exactly where the problems are and what’s harming your rankings. These tools also show you where you’re already doing a good job so that you can further optimize your store for even higher rankings.
How to Get Started
Step 1: Add Your Website to Google Search Console
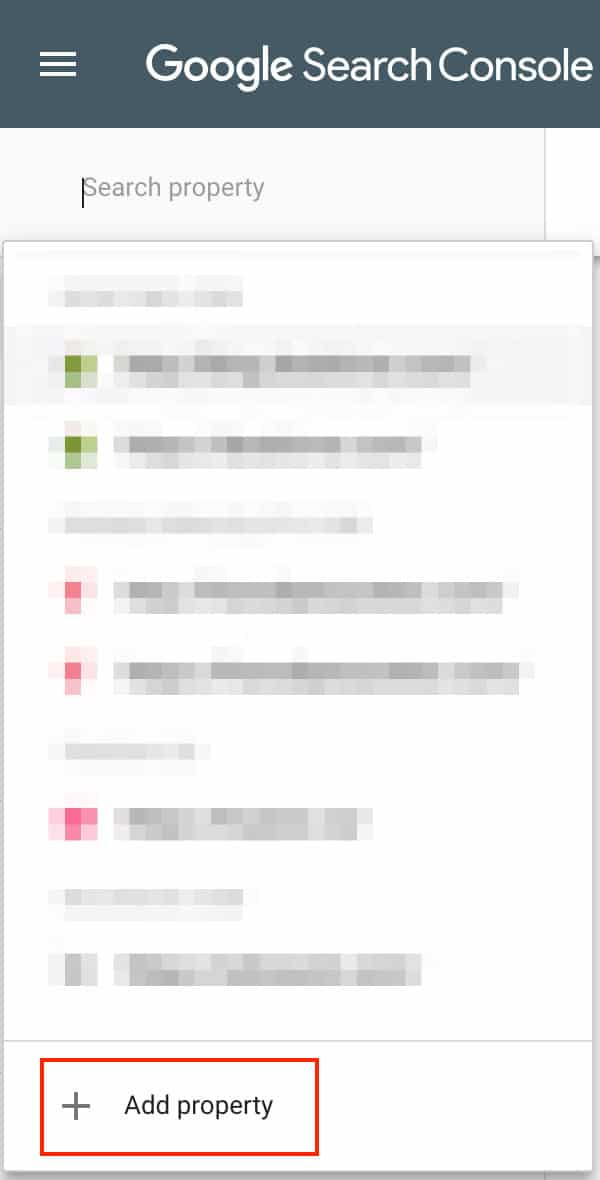
Go to Google Search Console and log in with a Gmail account. Then, click ‘‘Add property” under the search drop-down.
Enter your store’s URL and click “Continue.”
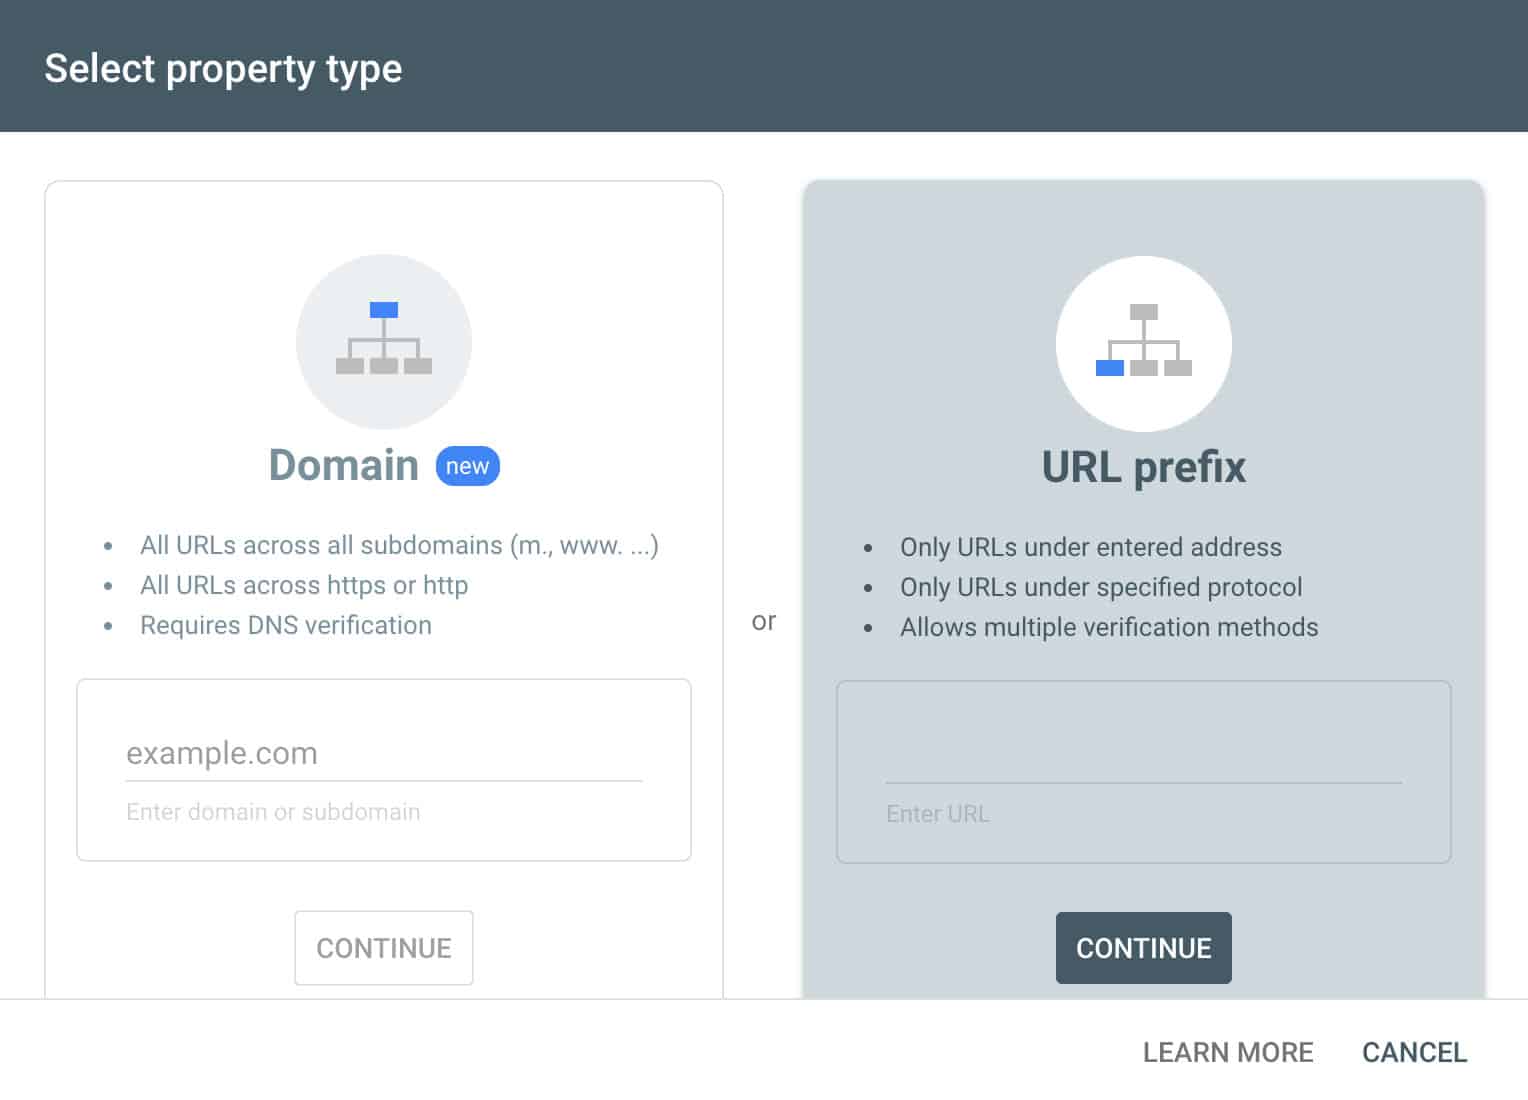
Now, if you have already connected your store in section one, Set Up Google Analytics, your website will be verified automatically. If you haven’t done that yet, you can verify your store by following these instructions for Shopify, BigCommerce, and WooCommerce.
Finish the setup with uploading your store’s sitemap. Learn how to find your sitemap URL for Shopify, BigCommerce, and WooCommerce. Once you have your sitemap URL, go to “Sitemaps” and submit it.
Step 2: Add Your Website to Bing Webmaster Tools
Go to Bing Webmaster Tools and sign up with your Outlook, Gmail or Facebook account. To add your website, go to “My Sites,” enter your store’s URL and click “Add.”

Next, add your store’s sitemap (find it the same way as for Google Search Console) and click “Add.”
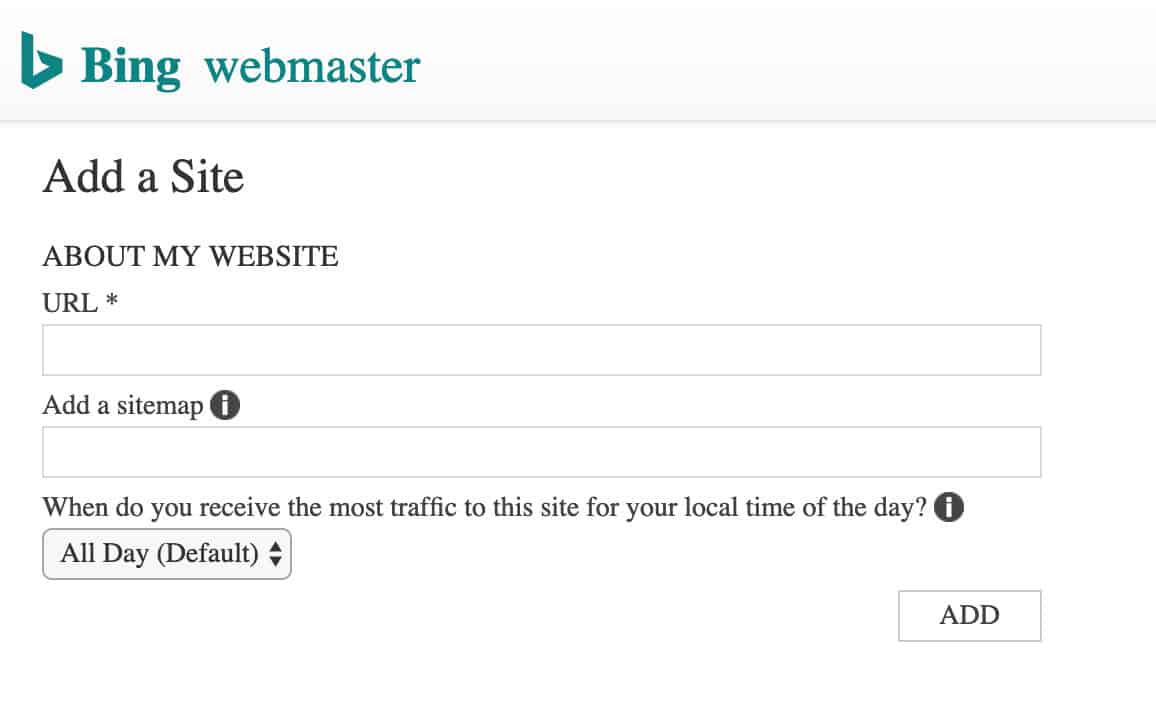
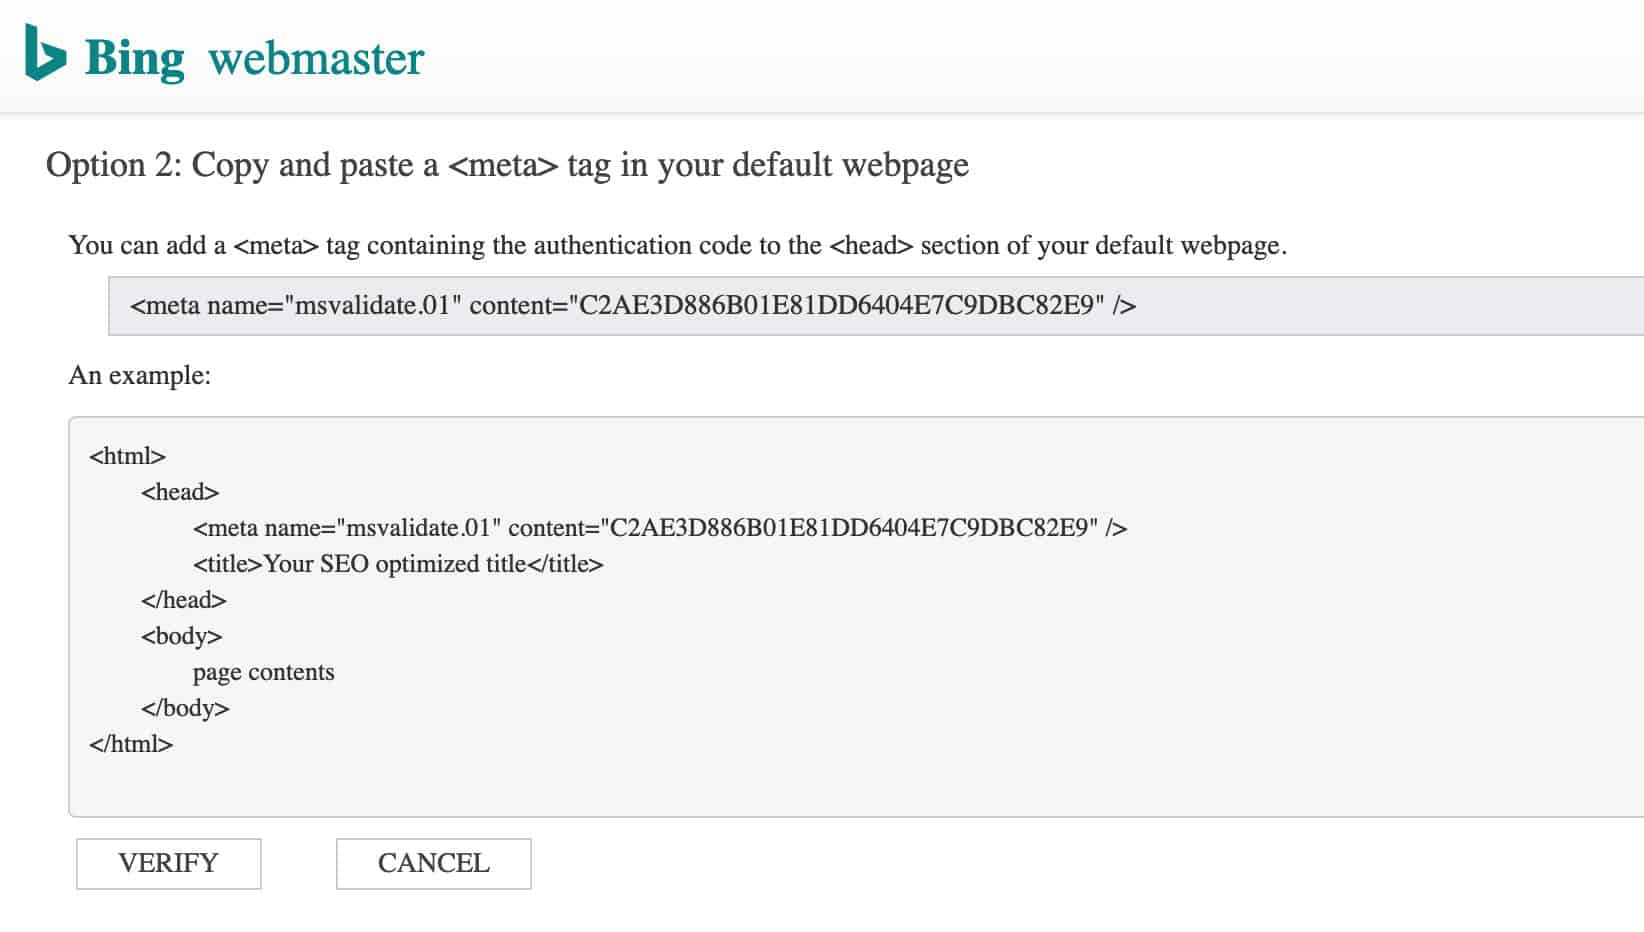
You’ll see verification instructions so that you can finish connecting your shop with Bing by verifying your ownership. There are three options—choose the one that requires copying and pasting a meta tag in your webpage. If you need help, here’s how to do it for Shopify and WooCommerce.
Recommended Resources
- How to Use Google Webmaster (Search Console) Tools For Shopify SEO by Carson
- The Ultimate Guide to Google Search Console in 2019 by HubSpot
Recommended Apps
- Google Search Console
- Bing Webmaster Tools
- Google XML Sitemaps (WooCommerce plugin)
- Yoast SEO (WooCommerce plugin)
Set Up Your Email Provider
A crucial component of any ecommerce store is its email service provider. Not only is it the base of all of your transactional emails (think order confirmations, shipping confirmations, and feedback emails) but it also is a powerful marketing tool. This is a mandatory part of having an ecommerce business and getting set up on it should be a priority.
Why it’s Important
The importance of email cannot be overstated; it’s one of the foundational tools for running your business successfully because it includes sending out order and shipping confirmations which have become an expected component of online shopping. They build trust with the consumer, as transactional emails provide direct feedback about the success of an order and set expectations for when the purchase can be received. This brings clarity and trust to online shopping which otherwise can run the risk being unclear and shady.
Equally important, is that it’s one of the most effective marketing channels you’ll ever have. One study found that 76% of online buyers have made a purchase as a result of an email campaign. To underuse email in your marketing strategy would be a loss for your business.
How to Get Started
The first step to getting set up with an email provider is choosing which email provider to use. There are many to choose from and you are free to select which platform speaks to you most (see our list of recommended apps below) but in this case, we’ll use Klaviyo to illustrate the process of getting started.
The first step is to create an account with the email provider and then to connect your store to the account. Klaviyo will ask you which ecommerce platform you’re on. They make it easy to connect with stores on Shopify, WooCommerce, Magento, BigCommerce, Volusion, OpenCart and more. With Shopify, you’ll only have to insert your store name, while with WooCommerce you’ll have to provide your API keys.
When your store is connected to Klaviyo, you’ll be prompted to set up a basic design for your email templates. Upload your logo (preferably without a background—so you’ll likely use a PNG file with a transparent background), set your social media handles, and choose the colors you want to have reflected in your emails. Those should be the same colors as what’s visible on your website to provide visual brand continuity. Klaviyo requires the colors to be denoted in Hex Color Code format. If you don’t know your website’s Hex Color Codes, use this Chrome extension to pick the colors from your website.
Once you’re set up, you can make use of the already set up Welcome Email Flows series, as well as craft your own emails. We suggest putting together these emails first:
- Order confirmation emails
- Shipping confirmation emails
After getting that done, you can move on to building out your email marketing system to include:
- Product review/feedback request emails
- Cross-selling emails
- Thanks for subscribing emails
- Abandoned cart reminders
Recommended Resources
Recommended Apps
Examples
- Really Good Emails by Mailchimp
Get Set Up on Gravatar
Gravatar stands for Globally Recognized Avatar and it’s an image that’s tied to your email address which appears beside your name across the web every time you comment on a blog, a forum, Slack, email, or even post an article yourself. In other words, your Gravatar is a small headshot uniquely associated with your email address that provides you with a unified and recognizable visual identity across the internet.
Today, Gravatar’s service is globally recognized and used by millions of people and websites including WordPress, GitHub, Hootsuite, Disqus, ModX and others.
In this section, we’ll show you why and how to set up and use your Gravatar.
Why it’s Important
If you haven’t set up your Gravatar, a default image will appear as the headshot near your comments or posts online which isn’t very personal or trustworthy, is it? Sure, you can add your bio description and image to every blogging platform separately, but Gravatar lets you save time and establish a universal identity across many channels.
Using Gravatar is a free opportunity to enhance your personal image or your brand as you post or comment on articles or perform other actions across the web. The main reasons for creating a Gravatar account are:
- Build an Expert Profile: If you’d like to demonstrate expertise in your business area, you should engage with relevant topics in respectable blogs, forums, and other industry-related websites. If you use a Gravatar profile, you’ll be instantly recognized for who you are thanks to the associated image and your profile with your full name, description, and links to your website and blog.
- Increase Traffic to Your Ecommerce Store or Website: If you add links to your Gravatar profile, anyone who sees your comments can have a look at your profile and eventually land on your website or ecommerce store. This, in turn, brings you more traffic and potentially increases your brand’s influence.
- Promote Your Social Networks: You can add links to your social media profiles in your Gravatar profile, thus increasing their recognition.
- Enhance Your Brand’s Authority: You can add your company’s logo as one of your Gravatars—this can help grow the awareness and authority of your brand.
How to Create Your Gravatar
Setting up a Gravatar is free and will take you less than 5 minutes. Here’s how to do it:
Step 1: Sign Up
Go to Gravatar’s website and sign up with your email or WordPress account (if you don’t have one already, WordPress will ask you to create one). You can add unlimited email addresses and Gravatars per account.
Step 2: Choose Your Image
Add one or several images under the “My Gravatars” tab. You can choose a professional headshot, an informal image of you or even your brand’s logo. The photo you’ll choose will depend on the kind of image you want to build around yourself and your brand.
You can also add several email addresses under the “My Gravatars” tab. For example, you can create different Gravatars for your personal and professional email. Or, you can add your info email and your company logo as a separate Gravatar.
Step 3: Customize Your Information
Add your name, description, and other details on the “My Profile” tab. In the case of the company’s official Gravatar, add links to your website or ecommerce store in the description.
![]()
Recommended Resources
- What is Gravatar? How to Create and Use it? by First Site Guide
- A Guide On How To Use Gravatar For Your Blog Or Website – 2018 by Make A Website Hub
- A Better Brand: Ecommerce Branding Guide by A Better Lemonade Stand
- How to Use Gravatars in WordPress by WordPress
Recommended Apps
Set Up Popups & Exit Intents
Email capture popups and exit-intent popups (sometimes referred to as “lightboxes”) are those boxes that pop up into the forefront of a website and bring attention to whatever the website owner wants to highlight. Popups can appear either immediately when visiting the site or after spending a certain amount of time on the website (for example, after 10 seconds or after scrolling down 50% of the page, etc.) while exit-intent popups only show up when the visitor starts to move their cursor towards the “back” or the “x” button to leave the page.
The contents of the popup can vary from offering the visitor to sign up to your email list, to collect a digital freebie like an ebook, or receive a discount for a purchase.
Why it’s Important
Website popups directly draw the visitor’s attention towards the one thing that you, the store owner, want to highlight. Combine that with providing value for your visitor (by offering something to them) and you’ve got a guaranteed recipe for success.
The goals you can achieve with popups can vary:
- Prompt visitors to make a purchase by offering a discount code as they arrive at your store. They’ll be more likely to buy if they already know they’re getting a discount.
- Capture them into your sales funnel by collecting their email. With their email, you can then send them campaign emails and other promotions to warm them up to make a purchase.
- Keep visitors in your sphere of influence by catching them as they’re about to leave. Either ask them to join your email list, give them a last-ditch discount, or remind them of your free shipping deals to get them to stay.
Essentially, popups are what let you hold on to a visitor. Because only 2% of first-time visitors are likely to make a purchase, it would be a pity to throw away the 98% that were interested but for some reason didn’t buy.
To hold on to more of those potential buyers, get them onto your email list or help them make a purchase with the use of popups and, as a result, increase your conversion rate dramatically. This ensures that any efforts used to increase traffic will not be in vain because you’ll be making the most of it with your popups.
How to Get Started
Step 1: Identify Your Goal
To get started, first consider your goal. Based on what the purpose of the popup is, you will have different content on the popup itself. Here are some examples of goals you might have for your popups along with what kind of content the popup should contain:
- The Goal is to Catch Leaving Visitors: Create an exit-intent popup with an offer to subscribe to your newsletter
- The Goal is to Make a Sale: Offer a discount as the visitor enters your store
- The Goal is to Grow Your Email Newsletter: Show a popup with free downloadable content, like an ebook or a guide, and ask visitors to provide their email address to get the content
Step 2: Choose Your Popup Provider
When you know your goal, choose your popup provider. There are many to choose from, but we suggest Sumo popups, which can be implemented into any online website including ecommerce stores.
Step 3: Create Your Popup
Then, you have to put together your popup. This includes choosing the design, the color theme, the copy, as well as the call-to-action (CTA) buttons.
For effective CTAs, turn the copy of the buttons into enticing text that prompts the visitor to choose your offer. For example, instead of using the default “No” option on the button, consider switching it to “No, I don’t want 15% off,” like this one:
Step 4: Go Live
Finally, launch the popups on your site! It’s never too early and it’s certainly never too late.
Recommended Resources
- Email Popups for Ecommerce: How to Collect Emails and Grow Sales by A Better Lemonade Stand
- Sumo Review by A Better Lemonade Stand
- Popup Statistics from 2 Billion Analyzed Popups by Sumo
Recommended Apps
Examples
- 40 Examples of Popups to Steal for Your Store by Printful
- 13 Simple and Surprisingly Effective Exit-Intent Popup Examples by MaxTraffic
Set Up Transactional Emails
Transactional emails are automated email messages sent after a customer performs a specific action within your website. These emails are not promotional in nature and often contain important information like registration or purchase confirmation, shipping notifications, password reset instructions or status updates.
To stay engaged with your audience, it’s imperative to have transactional emails in place for every possible interaction on your website. For example, if your customer signs up to your newsletter through a popup or a signup form, make sure that an automated “Thanks for Subscribing” email follows. If they make a purchase, make sure they receive an order confirmation email to ensure that they feel their purchase has been recognized on your end.
If done correctly, transactional emails can become a powerful way to enhance your brand and represent its voice, design, and personality.
Why it’s Important
Open rates for transactional emails are significantly higher (about 47% as opposed to 21.6% for non-transactional emails) since shoppers want to know that their purchase is confirmed or when their order will arrive.
Transactional emails are often regarded as technical or administrative communication that needs to be separated from newsletters and other marketing actions but since transactional emails have a higher likelihood of grabbing your customer’s attention, increasingly more marketers are seeing this communication channel as an opportunity to build their brands.
If transactional emails are executed in a smart and user-friendly way, they can generate repeat sales and increase customer engagement. According to The Transactional Email Report by Experian, the average revenue-per-transactional-email is two to five times greater than that of standard bulk emails.
Some ideas for customizing your transactional emails:
- Make your emails reflect your brand’s design and tone of voice
- Include how-to videos and/or user guides for products just purchased
- Add links to your social media profiles (or your mobile apps, if relevant)
- Offer exclusive deals for next purchases
- Incorporate cross-selling based on seasonality and purchase history
How to Set Up Transactional Emails
The largest ecommerce platforms, such as Shopify or WooCommerce, offer built-in transactional email systems that you can edit according to your business needs. For example, you can use Shopify’s transactional email templates to reach your audience after a new order is placed, a cart is abandoned, orders are sent out, and much more.
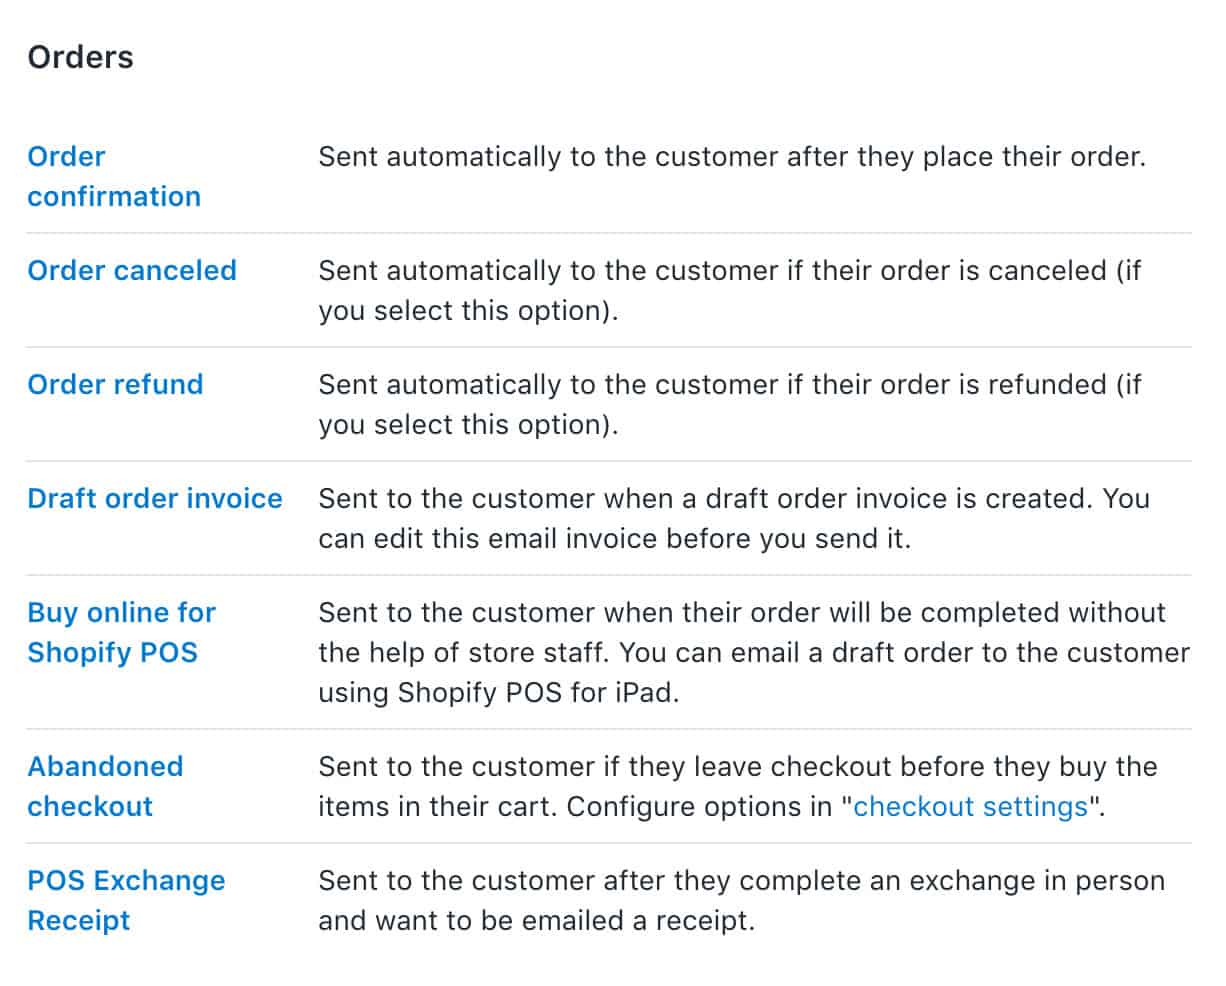
To set up transactional emails without using templates provided by your ecommerce platform, you have to choose a dedicated email platform for this and you’ll probably need the assistance of a developer, or at least some HTML and API knowledge. With time, you can learn how to code the content of the email (the text, calls-to-action, and visuals for example) but the developer will still be the one setting the triggers and conditions for sending the email out.
Some transactional emails that bring the most value:
- Order Confirmation Emails: When a visitor makes a purchase, they receive an automated email acknowledging it. This gives the peace of mind that their order has been successfully received. You can also use these emails to suggest other products your customer might like or provide a promo code for them to use on their next order.
- Shipping Confirmation Emails: When the product is sent out, the buyer receives an email letting them know. This sets expectations in regards to shipping times, and customers then know that they can begin to expect their order.
- Abandoned Cart Emails: Remind your visitors that they left an item in their shopping cart. Give them an extra nudge to complete the purchase by providing a discount code.
If you set out to create your own transactional email flow, think about all the relevant cases when you’ll need to send such emails. Then, determine the triggers and prepare the content for the emails.
Recommended Resources
- The Beginner’s Guide to Driving More Sales With Email by A Better Lemonade Stand
- The Transactional Email Report by Experian
- How to Personalize Transactional Emails With Dynamic Content by Hubspot
- How to Create the Perfect Transactional Email by Crazy Egg
Recommended Apps
Examples
Monitor Your Competitors
Being aware of your competitor’s actions, strengths, and weaknesses is one of the staples of any business. In the past, you’d have to listen to word of mouth from locals or count how many customers enter your store as opposed to your rival’s store. Luckily, today it’s much easier to keep an eye on your competition. For example, follow their new product or service launches, the events they attend, and the exposure they get across the web.
In this section, we’ll show you the tools and websites that will help you find out exactly where you’re standing amongst your competitors.
Why it’s Important
First, being informed about your competitors’ offers lets you see their strengths and weaknesses and build your own competitive advantage. You can adjust your own offer to match or beat your competition or come up with a strategy to stand out from the crowd.
Second, it can inspire your own content and strategy. If you see a brand doing well, you can dissect what they’re doing and, therefore, reverse engineer their success. You’ll see how they effectively communicate, how they build hype and revenue around new products, and how they engage their community. These are all things that can act as a pathway upon which you can inform your own strategy.
Finally, you can save time and money by watching the big players in your niche. Why? Because they’ve probably invested large amounts of money into market research and found out what works—the hard way. That way, you get to piggyback on the trends without having to invest in research and development yourself.
How to Get Started
In order to monitor your competitors, you need to get into their orbit. Here are several tactics to make sure that you’re getting the most out of your competitors.
Step 1: Make a List of Your Main Competitors
Ideally, fill a spreadsheet marking all of your competitor’s online activities: Their Google presence, pricing, and best features, for example.
Step 2: Google Your Competitors
Check out their presence on Google (which pages come up) and visit their website. Also, Google the name of your product, service or niche in several variations and check which company comes up first. Try to analyze why: Are they using paid advertising, have a better offer, a higher website domain, etc.?
Step 3: Follow & Monitor Social Networks
Pay attention to the content and frequency of your competitors’ posts. Search company names and topics by hashtags and find which keywords would be smart to use for yourself.
Step 4: Sign Up to Their Mailing List
Pay attention to the new products or features your competitors release, special deals they offer, the frequency of campaigns they send out, and the CTAs they use. You can also browse the Really Good Emails database for high-quality email examples from other companies in your industry.
Step 5: Closely Monitor Customer Reviews
Depending on your industry, your customers are likely to leave their reviews on Facebook, Trustpilot, Reddit and other sites where people talk about their experiences. Note how many reviews competitors have compared to your business and how satisfied people are, what the main complaints are, etc.
Step 6: Use Tools that Notify You When a Competitor is Mentioned
Use tools to monitor online mentions or when something changes on their site (find these tools in the Recommended Apps section below).
Recommended Resources
- 25 Sneaky Online Tools and Gadgets to Help You Spy on Your Competitors by Neil Patel
- 5 Ways to Determine Your Business’s Real Competition Online by SEMrush
- How to Research Your Competitors by BigCommerce
- Competitor Analysis Tools by Ahrefs
- Stop Copying Your Competitors: They Don’t Know What They’re Doing Either by CXL
Recommended Apps
- Mention: Notifies you whenever you or your competitors are mentioned online. It also integrates with Slack, bringing notifications into a dedicated Slack-Mention channel and offering daily recaps
- Visualping: Lets you select a portion of a competitor’s web page (like a pricing page) and get a notification whenever it changes
- SpyFu: Shows what keywords and Adwords your competitors are buying
- Google Alerts: Useful for getting your own and competitor mentions
- SocialMention: A tool for tracking social media and blog mentions
- Adbeat: Helps to monitor your competitor’s ad strategies
- SEMrush: Use SEMrush to track the most lucrative keywords that your competitors are ranking for
Operations
Track Your Business Receipts
Running your own business is all fun and games until you have to start organizing your receipts. There’s no escaping it; at some point, you will have to start dealing with that clutter of papers in your top drawer, and at the bottom of your briefcase, and in your jacket pocket.
Thankfully, there’s no need to do it the old-school way by writing everything down in a notebook or stuffing every receipt into an empty shoebox and forgetting about it. We’re moving towards a more paperless world and we also have technology on our side. There are plenty of receipt tracking tools available to help you save precious time, as well as provide access to your receipts from multiple locations which is something your accountant will come to appreciate.
Why It’s Important
First of all, good recordkeeping (and that includes keeping track of your receipts) will help you monitor the progress of your business, prepare financial statements, and your tax returns. Keeping receipts will also help you with tax deductions and might save your business money in the long run.
Additionally, by using receipt scanners and tracking apps, you’ll be able to automatically extract the key information—like the date, merchant, amount spent, and payment method—to keep tabs on your finances on the go.
While it might take some time to get used to new technologies, keeping your receipts online will dramatically reduce the time and effort you put into tracking and organizing expenses. It will also make it easier to hand that information over to your accountant and avoid hassles come tax preparation time.
How to Get Started
Right from the start, you should establish a system to organize your receipts. Will you:
- Stick to tried-and-tested systems and file receipts in binders and folders?
- Or will you embrace technology and use online services and apps, such as Shoeboxed and others listed below?
That’s up to you to decide. One thing you can do regardless of your choice is create a separate email account that’s dedicated to receipts and expense keeping only. This means that whenever you get a receipt, you scan and forward it to this email address and collect all receipts there. We recommend also creating an “accounting@yourdomain.com” email address that you can use to forward all digital business receipts to so they stay organized in their own inbox. Sign up to all your business-related tools with this accounting email and then set a rule in your mailbox so that everything sent to that email address gets automatically forwarded to your “Business Receipts” inbox.
That way, it will be much easier to keep track of your expenses and search for a specific receipt instead of going through several possible storage places like your email accounts, phone, computer, and other devices.
You can also connect that email to a receipt tracking app, like Neat or Shoeboxed so that all receipts are forwarded and logged automatically.
So, which types of receipts should you pay extra attention to and definitely keep?
- Meals & Entertainment: Document all your business meetings and record the purpose and attendees of every meal and outing on the back of the receipt
- Business Travel: Keep any travel-related receipts when traveling for business purposes
- Vehicle-Related Expenses: Record where, when, and why you used the vehicle for business
- Receipts for Gifts: Keep receipts for any business-related gifts you purchase
- Home Office Receipts: Keep receipts for costs related to running your home office
Recommended Resources
- Which Receipts Do You Need to Keep as a Small Business Owner by SquareUp
- How to Keep Your Business Receipts Organized by The Balance SMB
Recommended Apps
Online Security Best Practices
It’s surprising how often protecting our own businesses can be the last task on our to-do lists. No matter what stage your business is at—whether you’ve just launched or are successfully growing—make sure that you take the basic steps to secure it. After all, if you won’t protect your business, then who will?
Why it’s Important
When we talk about your store’s security it includes many things, from online attacks to losing files in a computer crash. Keeper Security conducted a survey and found the most common security problems small businesses face and here they are:
- Phishing (48%): An attempt to trick users into sharing sensitive information online such as passwords, usernames, and credit card details
- Web-Based Attacks (43%): Programs that are written to probe a user’s computer and exploit security holes
- Malware (36%): A virus or any other type of software intended to damage a computer or computer system
- Lost or Stolen Devices and/or Files (30%): Misplacing important devices or documents
- Denial of Services (26%): Flooding a website with fake (bot) traffic to slow it down or take it offline
Now, when it comes to online attacks, you may think that as a small business owner you’re not appealing to hackers. Unfortunately, you’re wrong. According to the data by SCORE, 43% of all cyberattacks are directed at small businesses and this number is expected to increase. Those who fall victim to cyberattacks have also been found to never fully recover, with 60% discovered to be out of business within six months.
If you don’t want to risk yours and your customers’ sensitive data, find some time in your schedule to secure your business.
How to Get Started
Here are the basics of protecting your business online:
- Use Unique Passwords on All Accounts: Make sure your passwords are strong, which means nothing common (like ”12345”) or guessable (like your name). Use a password manager like Dashlane for storing all your passwords and to generate strong passwords.
- Set up 2-Factor Authentication: This means that there will be two levels of authentication in order for you to log into the account. For example, if you set up 2-factor authentication for your Gmail account, you’ll first need to type in your password followed by a unique code that you’ll be able to access either through email, text message or from an authentication app like Authy. Most popular services support 2-factor authentication. Find all the places you can set up 2FA for with the Two Factor Auth List.
- Secure Your Email: First, turn on 2-factor authentication—it will protect your email from getting hacked. Second, watch out for phishing emails and malware and don’t respond to them.
- Use a VPN on Shared WiFi: A Virtual Private Network (VPN) is a tool you can use to encrypt your internet connection which helps to protect your login credentials and other sensitive information from hackers sharing the same public WiFi as you. Using a VPN is imperative if you work in coffee shops, airports or any kind of public space but it’s generally just a good tool to use at all times. Check out NordVPN to set up your own VPN.
- Encrypt Your Devices: So that in case they get stolen or lost, no one can access your files. Here’s how:
- Mac: Enable FileVault in your Settings panel
- PC: Use BitLocker if your computer is compatible. Otherwise, use one of these alternatives
- iPhone: Encryption is enabled automatically with your passcode
- Android: Select the “Encrypt phone” option under Security in your settings menu
- Back-Up Everything: Your website, your computer files—everything. You don’t want your business to stop (or die) just because you’ve lost important files like product sketches, print files, copyright certificates, or because an accident happens and your website crashes. Use Rewind (Rewind Review) to backup your Shopify or BigCommerce store and use VaultPress to backup your WordPress site or WooCommerce store.
- Recognize Fraudulent Orders: Over the next 5 years, retailers are estimated to lose over $130 billion on fraudulent orders. Pay attention to red flags like larger-than-average orders, unusual locations, multiple transactions over a short period of time, etc. Your payment processor may also be able to help you spot fraudulent purchases which can help you steer clear of them.
- Diversify Your Marketing & Revenue Stream: Sell your products on several platforms and use different marketing channels to promote your business so you’ll protect your business and revenue stream in the even that sudden third-party policy changes result in denial of services. This is a relatively common thing that can happen to sellers on marketplaces like Amazon or Etsy and if you’ve put all your eggs into one basket it can be catastrophic for your business if you’re ever banned from a selling channel.
Recommended Resources
- How to Bulletproof Your Online Business by A Better Lemonade Stand
- The Basics of Ecommerce Fraud—What It Is and How To Manage It by Printful
- Two Factor Auth List
Recommended Apps
Set Up Your Policies
Website policies are a set of rules, procedures, and guidelines that define the operating principles of an online store. Simply put, website policies explain what customers can expect from the website, how it operates, what type of data it gathers and why, the rights and obligations of a website user, the shop’s shipping and returns policies, etc.
Here are the 3 website policies that every ecommerce store must have:
- Privacy Policy: This describes what data (email, physical address, cookies and browsing history, etc.) you collect from your website visitors and purchasers and for what purposes. In certain countries and states, a privacy policy is required by law.
- Terms of Service: This defines what customers can expect from your business as well as their rights and obligations. Basically, it’s an agreement between the store and its users.
- Returns Policy: This states how a store handles returns and/or exchanges. A user-friendly returns policy can make your shop look more trustworthy and help encourage consumers to shop with you.
Why it’s Important
California, the European Union, Canada, Australia, as well as other jurisdictions legally require online sellers to state their privacy policies. It doesn’t matter where your business is based, if you sell to these states and countries then you must have policies that describe how your store collects and uses customer data.
While some jurisdictions are quite lenient with privacy policies, others impose strict laws to protect customer data. For example, the EU’s GDPR (General Data Protection Regulation) imposes fines for non-compliance which can be up to $22.8 million or 4% of the annual revenue, whichever is higher.
Besides complying with laws, there are other reasons why your store needs policies:
- It Increases Trust: Clear store policies make your business look transparent and trustworthy. In fact, a survey found that 63% of online consumers look at a store’s return policy and only then make their buying decision.
- It Boosts Conversions: Naturally, when people find a business trustworthy, they are more willing to make a purchase.
- It’s Required by Third-Party Solutions: Services like Google AdWords, Google Analytics, Facebook, and many other services that process customer data and then allow you use the data for your marketing (think: retargeting, traffic analytics, etc.), require online stores to have a Privacy Policy.
How to Get Started
Step 1: Find a Template
The good news is you don’t have to write your store policies from scratch or hire a lawyer to do it. The internet is full of templates that you can customize and use for your shop. Here’s what a good template looks like:
- It’s Easy to Read & Understand: Avoid templates that use jargon or complex sentences, or you risk leaving your customers confused and suspicious. Besides, if you sell to Europe, remember that according to GDPR your privacy policy must be clear and easy to read, or you can be fined.
- It’s Brief: Don’t make your policies longer than needed, or your customers won’t read them. Make sure your policies provide visitors with all the information needed in a clear and concise way.
- It Includes All the Important Terms: Each of your website policies—terms of service, privacy policy, and refunds policy—should include different terms. Below what each of the policies should include.
Terms of Service:
- Payment Details: What payment forms you accept, what currency customers will be charged, etc.
- Delivery Information: What shipping methods you offer, average delivery times, etc.
- Returns & Refunds: Whether or not you accept returns, whether you offer product exchanges, how you process refunds, etc.
- Warranty: Do you offer a warranty and for how long?
- Trademarks: When people can or can not use your products and what references they must give
Privacy Policy:
- What information your company collects and for what purposes
- The storage, maintenance, and security of collected data
- If your company shares the data with third parties
- The process of updating user information (for example, how to unsubscribe and delete one’s data)
- Your cookie policy, including what types of cookies your company uses and for what purposes
- Potential for change in the privacy policy which is basically a disclaimer that your privacy policy can change and get updated
Returns Policy:
- Your return window
- What condition the product must be returned in (unused, unworn, tags still intact, etc.)
- How to initiate a refund
- Where to return the goods
- Who pays for the return shipping
- How the refund will be provided (whether in the same payment form it was collected in, store credits, a gift card to the store, a replacement product, etc.) and in what time frame the refund will be processed
Step 2: Add Policies to Your Website
There are two ways you can display your policies on your website:
Browsewrap: As a link in the footer of your website

Clickwrap: As a box that users must check at the checkout when making a purchase, or when subscribing to your newsletter

The best way is to implement both browsewrap and clickwrap methods, that way your visitors are more likely to feel safe and informed.
Recommended Resources
- GetTerms.io
- Terms and Conditions Generator by Shopify
- Privacy Policy Generator by Shopify
- Free Return Policy Generator by Shopify
- Sample Privacy Policy Template by TermsFeed
Outsourcing Tasks
When building a business, it can be tempting to try to do everything by yourself, however, you only have 24 hours in a day to create your products, write the copy for your webpages, plan the logistics, do the accounting, oversee marketing and PR, handle customer support, and so much more. There will never be enough time to get it all done yourself so this is why it’s important to find other professionals to do some of the work in your stead. That’s called outsourcing.
Outsourcing is the practice of using an outside party—such as another company or a freelancer rather than your business’s employees—to perform certain services or job functions. The purpose of it is to delegate tasks to someone else in order to free up your own time.
Here are some of the tasks you can consider outsourcing:
- Content marketing
- Logo design
- Bookkeeping
- Research
- Conversion optimization
- Graphic design
- Translation
- Social media
- Photo/video production
Why It’s Important
Research shows that when trying to manage multiple projects at once, you can experience a 40% drop in productivity, your projects take longer to complete, and overall stress levels increase. Especially for small businesses or startups, any reduction in everyday tasks will let you shift the focus to more revenue-generating activities.
Another great reason to outsource is that it allows you to access skilled talent nearby or worldwide. There are so many tasks that are best left to the pros rather than trying to fumble through them yourself, so those things are best outsourced to the people who can execute them properly and efficiently. Think of it this way—if it’s going to take you a lot of time to figure out how to do a mediocre job at something, you’re better off outsourcing the task to someone who can complete it better and faster than you can.
Besides, having a fresh perspective from someone outside of your team can lead to innovative, creative approaches and cutting-edge solutions that would otherwise remain hidden to you.
Last but not least, outsourcing can also save you money. When you outsource to a freelancer or contractor you won’t incur the same costs as you would hiring an employee, plus by hiring someone to complete a task you don’t know how to do, it saves you the time it would take to learn how to do it yourself and time is money in the long run. Outsource the work you can’t do to people who can so you don’t have to spend more later to fix the mistakes you made trying to do everything yourself.
How to Get Started
Step 1: Identify Outsourceable Tasks
Begin by figuring out what type of work you want to be done: Is it social media? Bookkeeping? Content creation? Try to think of the aspects of your business where you need help or expertise, but don’t have enough hours in the day to do yourself.
Then, define the scope of the work whether it’s a short-term task you want to outsource or if you’re looking to collaborate for recurring projects.
Step 2: Find a Contractor
Next, find the right contractor. If you know a professional you’ve worked with previously (or have recommendations from friends or colleagues), start looking there.
Otherwise, there are virtual freelancer marketplaces like Upwork or FreeeUp, where you can connect with professionals from all over the world. Check their portfolio to see whether their skill set and rates match your needs and if there are testimonials from previous clients to provide reliability. Then get in touch with the freelancers or contractors you’re interested in with any additional questions about their knowledge and expertise, when they’re next available, and their compensation requirements.
Step 3: Provide a Brief & Define the Working Relationship
Once you establish a working relationship with your contractor, provide detailed instructions about the task, as well as prepare a contract which may include information like:
- What work the freelancer will deliver and when
- If the project is fixed-price or hourly
- Price rates
- When and how payments will be made
Communication is the key to a great outsourcing experience, so be sure to communicate throughout the project to make sure the work is being done and your expectations are met.
Recommended Resources
- 10 Tips to Source and Hire The Best Freelancers Online by Upwork
- How to Grow Your Business by Hiring Freelancers by Guru
Recommended Apps
Examples
- 5 Outsourcing Success Stories (and 2 Failures) That Any Startup Could Learn From by Daxx
- 14 Multi-Million Companies Who Were Built Leveraging Outsourced And Remote Developers by Codeable
Generate Traffic
Set Up Social Media Automation
Social media automation is the process of creating and scheduling social media posts in advance. Instead of setting aside time multiple times per day for creating and posting live updates, you could publish them at predetermined times, or even use a tool that automatically filters or recycles relevant content onto your social channels on your behalf. Automating this process helps save time and lets you focus on other tasks at hand.
You can automate your social media channels by using social media automation tools that both automatically suggest content you can share, as well as schedule posts in advance. Some tools are able to use your existing posts and reuse them in varying formats, and others can even post your updates at times the app has calculated that your audience is at their most active.
Why it’s Important
Setting up an automated system for scheduling your social media posts will help you:
- Maintain Consistent Content: Data shows that consistency is one of the most important factors why people continue to follow a brand, thus helping you to build a larger follower and customer base. Setting up an automated system and scheduling posts ahead can ensure that your social accounts are active even if you are offline.
- Control Your Social Media Strategy: When all posts are scheduled through the same platform, it will be easier to oversee the kind of content that is shared, as well as the time when you post it.
- Save Time: Instead of spending hours to manually log in and out of each social media platform, you can use a centralized dashboard on the automation tool to create and schedule content in advance.
How to Get Started
Step 1: Select an Automation Tool
Start by picking a social media automation tool from the list below. On the tool’s platform, log in to the social media accounts you want to automate posts for.
Step 2: Schedule Posts
To schedule updates, enter the text, add media (pictures or videos), and any links you want to share. If you have more than one account connected, you can select which accounts the post should be shared with.
You can either publish the posts immediately, add them to the queue and let the automation tool pick the best time for publishing, or you can schedule the posts yourself, choosing a specific date and time. Fill up your social media content calendar by scheduling as many posts for the future as you like. You can use the tools’ content libraries to pull in relevant posts to beef up your content, as well.
Most of the social media automation tools let you access their analytics page where you can see what kind of engagement there is on your posts. Keep an eye on what kind of posts perform well and share more content that resonates with your audience.
Recommended Resources
- Social Media Automation Rules No Brand Should Break by SproutSocial
- Why You Should Get Serious About Social Media Automation by Jeff Bullas
- Social Media Automation: Good, Bad, or Somewhere in Between by Articulate Marketing
- Content Gems for discovering new content to share
Recommended Apps
Examples
- 15 New Social Media Templates to Save You Even More Time With Your Marketing by Buffer
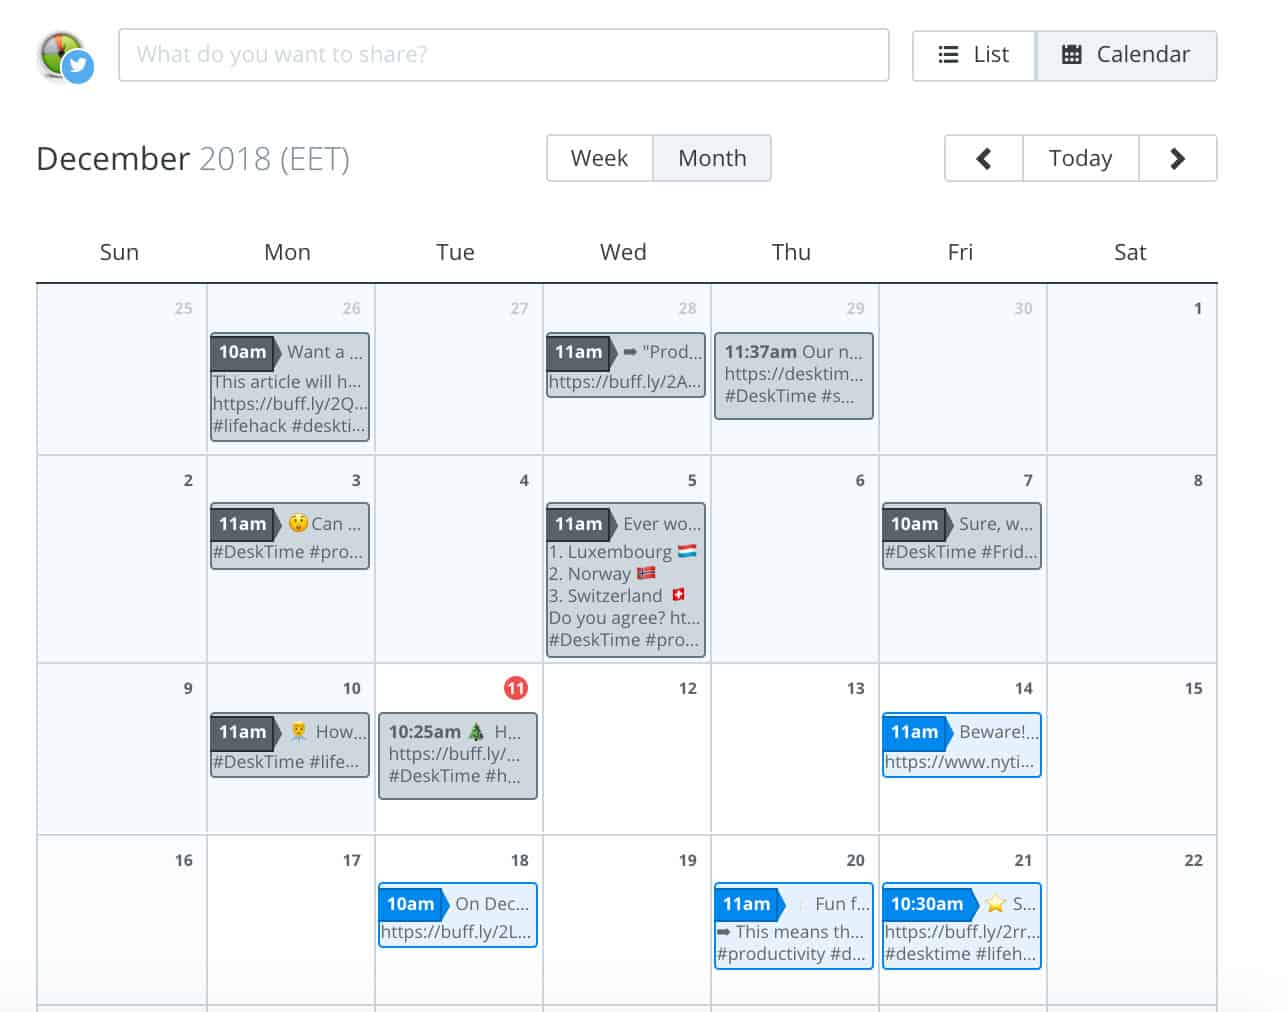
- See the social media calendar below including published and upcoming posts on Buffer
Conclusion
Once you get through this list, your new online store will be better set up to approach future tasks. You’ll be prepared to acquire website traffic, convert customers, delegate work to freelancers and contractors and get started marketing your new store. For more ideas on how to market your store to new customers so you can get more traffic and sales, check out the rest of our 52 Week Marketing Plan. We cover in-depth how you can actually get people to your store and what you can do to keep them there so they make a purchase.


